|
Deck & Fence Sealing / Staining
Painting Incorporated is the Authority when it comes to Deck & Fence Sealing / Staining.
We have been cleaning and sealing decks for over 30 years. We professionally restore decks to beautiful condition, clean,
seal &/or stain.
Why take chances with a franchise or a sub-contractor?
Get
a real deck expert!
Deck & Fence Sealing / Staining
|The Facts on Deck Sealing| The Facts on Deck Sealing
|Why seal anyway?| The Facts on Deck Sealing
|Why seal anyway?| Why seal anyway?
|What is sealer?| Why seal anyway?
|What is sealer?|![What is sealer?]() What is sealer?
|Deck Cleaning| What is sealer?
|Deck Cleaning| Deck Cleaning
|Deck Sanding / Refinishing| Deck Cleaning
|Deck Sanding / Refinishing| Deck Sanding / Refinishing
|I don't need to clean my deck...do
I?| Deck Sanding / Refinishing
|I don't need to clean my deck...do
I?| I don't need to clean my deck I don't need to clean my deck
...do I?
|I have a Brand NEW deck / fence| I have a Brand NEW deck / fence
|Deck stripping| I have a Brand NEW deck / fence
|Deck stripping| Deck stripping
|Deck Sealing| Deck stripping
|Deck Sealing| Deck Sealing
|Deck Staining| Deck Sealing
|Deck Staining| Deck Staining
|When to apply sealer| Deck Staining
|When to apply sealer| When to apply sealer
|Methods of applying sealers| When to apply sealer
|Methods of applying sealers| Methods of applying sealers
|How to seal a deck| Methods of applying sealers
|How to seal a deck| How to seal a deck
|What gets sealed| How to seal a deck
|What gets sealed| What gets sealed
|The water test| What gets sealed
|The water test| The water test
|What about Fences?| The water test
|What about Fences?| What about Fences?
|Composite Decks| What about Fences?
|Composite Decks| Composite Decks
|Deck / Fence carpentry| Composite Decks
|Deck / Fence carpentry| Deck / Fence carpentry
|Contact
Us| Deck / Fence carpentry
|Contact
Us| Contact Us Contact Us
Types of Deck Sealers
Clear / Natural Sealers
Tinted sealers / Toners / Natural toned stains / Natural toned sealers
Semi transparent sealers / transparent stains / Semi Solid stains
Solid color stain / Stain / paint

This Brazilian hardwood deck was hand
washed before applying the finish.
This Ipe deck and
handrails were sealed with Ipe Oil
Ipe oil deck sealing 
Spiral staircase, Ipe
steps by Michael Thatcher
When it comes to cleaning and sealing a deck, often times it is something that almost anyone might be able to do, but then;
Sometimes you want a professional to do it because there are different types of sealers for different reasons and different
types of lumber, and not all sealers or stains are applied the same way - and most people really don't know how to do it right.
Back to Deck Menu

|
| Cave of the winds Niagara Falls |
THE FACTS: on deck sealing
The main, number one goal in sealing a fence or deck; is to keep water out....The second goal is to protect from the sun.
WATER is the enemy of lumber, and it is the beginning of a chain reaction of destruction. Once water is in the lumber,
it starts to break it down. It makes the wood fibers soft, expanding pores, eventually inviting insects, encouraging mold
and algae, and harboring pollen, dirt, and dust in cracks and crevices. Termites, ants and carpenter bees love lumber that
is degrading.
Spring rains saturate the lumber causing algae and mold spores which are blown in on the wind, and embedded in the pores
to grow and reproduce, creating discoloration.
The hot summer sun bakes down on the lumber. Harmful U.V. rays eat at the lumber daily, while the sun evaporates moisture,
which causes cracking, splintering, cupping, warping and bowing.
Winter time's cold freezing temperatures expand the water already soaked into the lumber as it turns to ice, causing further
destruction.
Spring time comes around again, and your deck is falling apart.
Back to Deck Menu
Why seal anyway?
Water is your lumber's enemy, that, and the sun.
Sealers prevent water from getting into the lumber, and some sealers also provide ultra violet (U.V.) protection from the
sun.
Without a sealer on your deck or fence, you are inviting nature to destroy it.
Inevitably, your fence or deck will not last forever, but just as you can live a longer and healthier life if you take care
of yourself, you can also extend the life of your exterior lumber fence or deck with some occasional preventive maintenance
by applying a sealer.
Back to Deck Menu
What is Sealer?
A sealer is a type of product that you would apply on something, in order to keep moisture in or out.
Sealers can be made
of many things, and are often used on brick, tile grout, slate, concrete floors, leather, decks, fences, hardwood floors,
paper cups, and millions of other items.
...But to keep it simple, let's just focus on lumber sealers.
When it comes to lumber sealers, there are basically only three types:
- Oil
- Latex
- Emulsified Latex / Oil
There are three types of finish:- Clear / Transparant
- Semi-Solid
- Solid
Because there are so many manufacturers who make lumber sealers & stains, and each manufacturer making different types
and grades of sealers and stains, it can be pretty confusing for the novice while standing in the hardware store staring at
all the many types of sealers and stains that are available.
It doesn′t matter if they call it Toner, Clear, Natural, Transparent, Semi-Transparent, Semi-Solid, Solid, oil, latex,
emulsified, or STAIN;
All of them are considered ″sealers″. Any one of these will protect your deck
from water, but not all of them will protect from the sun.
Deciding on which type to use is the difference between doing
it, and doing it right. Color is MORE than personal preference if not ruled by your HOA. The darker the color, the better
U.V. protection.
Back to Deck Menu
Oil Stains & sealers
Depending on what type of lumber you have, and how you want your deck or fence to look, oil stains or sealers can be an option
for you.
- Oil penetrates deep into the wood pores creating a barrier that water can not get past, unlike latex stains and sealers.
- Oil
rejuvenates the lumber of natural missing oils
- Almost all oil stains and sealers allow you to see the natural wood
grain show through.
But then...- Oil is a bit more complicated to apply, and it′s messy to work with.
- You
may have to apply every year or so.
- If you use rags to wipe the oil, be carefull - they will self combust!
Back to Deck Menu
Latex stain & sealers

Behr "Russet" Solid color deck
stain on the flooring, Behr "Ultra Pure White" Solid stain on the rails and balusters.
First the good news:
- Solid stains provide for easy application, and easy cleanup (water based product).
-
Solid stains are the best in U.V. protection - (the more pigments in the color, the better U.V. protection) *Lasts 5 - 15
years Pre-packaged from the manufacturer in a few popular colors, and can be mixed to create almost any color you like.
-
Solid latex stain (or paint)is often times the cheapest fix if your deck or fence is horrible looking, or if you're a "do
it yourselfer", or if your H.O.A. specifies a certain color, and if you're considering using a solid color stain on your lumber,
painting is also an option.
Now the negative side;-
Solid stains and paints hide the wood grain completely.
Latex solid stains and paints applied on a horizontal surface where water sits(such as your deck flooring or deck handrails),
ends up allowing water in over time - and under the finish.
You won't see it until it′s too late, but often causes
the lumber to grow mold and rot.- You can not apply a solid latex stain over a previously sealed deck that was not
last sealed with latex.
You may need to remove the old finish by power washing, sanding, or using a detergent or chemical
to prepare the surface. -
Latex stain is a commitment, because it is extremely hard to remove once dry, but over time will eventually flake and peel
off anyway (The more sunshine you recieve, the better chances of massive flaking).
Most homeowners (who seal their own deck themselves) use a latex product that is ″Rated #1″ on T.V. commercials
and sold at big ″box stores″, and there are many contractors who also use latex stain for the ease of use.
Emulsified Latex / Oil (Stains & sealers)
Emulsified latex / oil stains & sealers are very popular, it is what′s on the market these days - especially in
Virginia. - They are VOC (volatile organic compounds) compliant, and environmentally friendly.
- There are different
levels of quality and a wide range of manufacturers available.
- They absorb into the lumber and provide a surface coating at the same time.
- Many last longer than an oil finish,
and when applied correctly can last for many years.
What is the best sealer or stain?
Contrary to what you might believe or have heard, there is no ″best″ sealer or stain. It all depends on where
you live, how much sun you get, how much moisture, what you are trying to accomplish / the look you want.
Back to Deck Menu
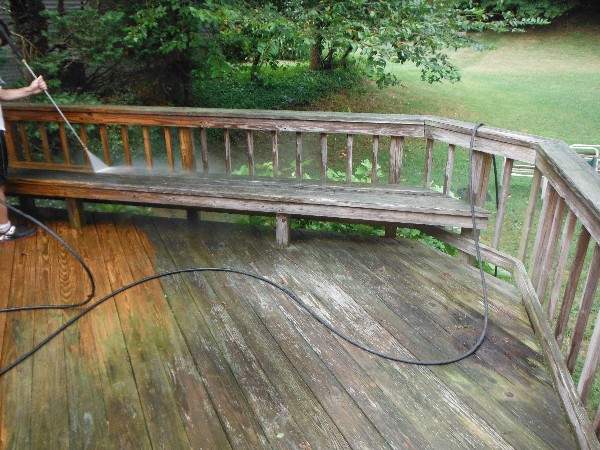
Deck Cleaning
Just as you would not wax your car before cleaning it, you wouldn't want to apply a sealer or stain, to any deck or fence
that isn't clean.
A clean surface ensures proper adhesion, it helps with longevity with any product, and most importantly, confirms with manufacturers
application specifications regarding terms of the warranty. Methods of cleaning
The method of cleaning lumber depends on what type of lumber you have, the condition, how dirty, whats on it now, and what
are your intentions afterward. Certain redwoods and cedars must only be gently hand washed with a mild detergent, then
rinsed thoroughly, while most others may require a deck cleaning detergent and/or brightener,
still others can easily be pressure washed only.
Some manufacturers of sealers and stains will only honor their warranty if the lumber is cleaned a certain way.
Most decks in the United States are built from yellow pine.
Although yellow pine is considered a "soft wood", it is
pressure treated with chemicals that give it durability, repel insects, and keep water out. Unlike cedar and redwood, pressure
treated yellow pine decks are an ideal candidate for power washing, while cedar and redwood are not. Exotic woods such as
Ipe or merbau should be washed by a soft bristle scrub brush and a mild detergent made specifically for doing just this.
A
low pressure washer can be used, but it's a fine line between cleaning and destroying, so leave this option for a pro.
Back to Deck Menu
Deck Sanding / Refinishing

Power washing the deck to remove
everything we can.
Preparing to sand the deck / remove the old
finish.
Using a finer grit of sand paper
to get a smoother finish 
Quality sealer applied,
this deck has been refinished
Deck sanding (prior to applying the sealer or stain) is sometimes a good idea for any deck other than brand new, however,
not everyone wants (or needs) this additional service.
Depending on how much sanding is needed, deck sanding will get rid of raised wood grain and splinter fray.
A more intense
sanding can remove old finishes and help even out the lumber where wood pulp is missing. For some particular types of stains
and sealers, sanding a deck opens the pores in the wood allowing for the finish to take hold better. It makes the finished
product that much more professional; in both the appearance, and in sealer adhesion / effectiveness.
The cost of having your deck sanded, ultimately depends on how much sanding is involved, but other factors include; how intricate
the structure is, lumber direction(s), type of lumber, and what is currently on your deck.
Back to Deck Menu

"I don't need to clean my deck...do I?
Usually, the answer would be:
"Sorry, but yes you do, no exceptions".
1.) On the back label of the sealer, the manufacturer specifies that their product warranty is void unless proper application
methods were followed. Every manufacaturer mentions cleaning prior to applying their product.
2.) Even though you can't see it, there is dirt, pollen, dust, and mold spores.
By applying sealer over this, the sealer may not adhere correctly, and may dis-color. We clean and seal decks all the time,
we see it alot.
But on the other hand...
Depending on how dirty, and what type of finish you have in mind, there may be an exception to the rule.
To play it safe, we prefer to clean before applying anything, but if you insist, at least we can say; "we told you so."
Can I clean the deck myself and save money?
You can do what you want, but if we're not cleaning your deck, we can not honor the sealer / stain warranty.
Back to Deck Menu
We've got a BRAND NEW DECK / FENCE
Congradulations!
If it is yellow pine, you might be tempted to seal it up, or apply a stain, but don't do it - Yet.
If you seal it up or stain it right now, the sealer or stain won't hold.
What you want to do, is to allow the lumber to weather for a while.
It is usually a good idea to allow the lumber to weather
anywhere from six weeks to six months, depending on where the deck is located (shady vs. sunny), and how much rain you get.
You see,
When they cut down the trees to make the lumber, they process it, by submerging it in a mix of chemicals, and under pressure,
the chemicals are forced into the wood, in order to preserve it.
This pressurized chemical treatment keeps insects from eating it and water from getting into it, sort of like a rail-road
tie.
This treatment process often causes the lumber to turn green, hence the term "pressure treated green", or "green wood".
By allowing the lumber to weather awhile, you're allowing the factory chemicals to dissipate. Ultra violet rays of the sun
make that green color fade away.
Don't let your deck go unsealed too long. Keep an eye on it, watch as the green fades away, and then clean it, and seal
it up.
If your yellow pine deck was just built, or you have a new yellow pine fence, you can't go wrong if you wait till the end
of the season, or even the beginning of next season, to seal it up.---just don't seal it up immediately!
If your lumber is an exotic hardwood such as Ipe, the choice to seal is up to you and is not really necessary.
If you plan
on sealing it anyway, don't wait, and don't use a surface coating - penetrating oil is best - although you may find you're
sealing it back up often.
Back to Deck Menu
Will power washing destroy my lumber?
No, In the hands of an experienced user, power washing can quickly clean your fence or deck better than most anything,
chemical free.
With an expert, your lumber will not be harmed, nor will any of the surrounding plants.
With that said, power washing lumber is not what destroys it anyway.
If your deck: - has not been regularly maintained, and water has absorbed into the wood pores
- If someone
has already applied a cheap quality sealer
water may have already made your lumber rough, warped, cupped, split,
etc...and may already be under the finish - unable to escape - ruining your deck and creating black mold embedded in the lumber.
If either is the case, your lumber may already be soft between age rings, and power washing will remove loose wood pulp
- which is actually a good thing since your deck needs to be free of all debris before applying anything new - including rotted
/ loose wood pulp.
The solution for you may be to have your deck refinished (sanded).
Back to Deck Menu
What about Chemical Cleaning?
We use no chemicals at all, unless agreed upon, and in writing.
Depending on the need, there are gentle cleaning solutions available on the market that will not harm plants and animals,
and in extreme cases, there are even stronger solutions. Most deck cleaning chemicals available today are a mild detergent
with a bleaching additive to brighten the wood. There are also specialty cleaners that focus on tannin streaks, oil stains
and tree sap. We are experienced in any circumstances should the need arise; however, as mentioned above, chemicals of
any kind are never used unless discussed and stated on our agreement.
Power washing is usually enough to get most decks ready for finishing, and is the least expensive.Power washing
with the additional cost of chemicals and/or use of detergents will cost more.Hand washing (not using a power washer
at all), is the most expensive of the three.
Back to Deck Menu
Deck Stripping
The V.O.C. laws went into effect in Northern Virginia by the E.P.A. a few years ago. This law regulates the amounts of
volatile organic compounds that manufacturers can use to create their paints, strippers, chemicals, and cleaners. The paints
used by your GrandFather have slowly been taken off the market. The old lead base, oils, and varnishes.
The strong deck strippers are not availble anymore, but in their place are new, environmentaly safe strippers that are no
where as strong.
Stripping a deck can be pretty expensive, and we can do it, but there are other alternatives.
Choosing a Sealer?
1.) Sealers that are pre-tinted from the factory have better U.V. protection and outlast sealers tinted in the store. This
is because the store uses "universal" tint colors that can be used with many other products, while the pre-mixed sealers from
the factory use a precise blend of specific ingredients.
2.) Manufacturers of Sealers often times make different "grades" (or quality mixes) of sealers, Therefore, not all deck
sealers are equal. Most products specify on the label that they last a certain amount of time, but this all Depends on
how much sun and rain your deck gets, and what color (if any) you decide to use.
Back to Deck Menu

Clear and Natural sealers
Clear
Clear Sealer will allow the wood grain and texture to show, and remain completely transparent. A truly CLEAR sealer does
not have any U.V. protection at all, and we never recommend a true clear for anything other than sealing brick, concrete,
slate, or on a surface out of the weather and away from the sun. Clear sealers are the Least in U.V. protection.
*Lasts 6 months - 1 year, Non tintable, pre-packaged from the manufacturer, Usually used for sealing concrete, brick,
slate, and even lumber (decks and fences) - but not all are good for lumber.
Natural 

Natural clear is usually NOT actually CLEAR at all, but tends to darken the lumber a bit depending on how old the lumber is,
the type of lumber, and which manufacturer you go with, some manufacturers are darker than others. If you're sealing lumber,
and you think you want to use CLEAR, then NATURAL or maybe even HONEYNUT is the closest thing to it that we would recommend
- depending on which manufacturer. The color image shown above is what Cabot's "Natural" looks like on brand new pressure
treated lumber - it looks darker on older lumber, and it looks different on how the lumber was cut (such as fence boards).
Something slightly darker might be "Heartwood" (by Cabot's)(shown below). Natural sealers are better in U.V. protection
than clear. *Lasts 1 year - 3 years, Usually Non tintable, pre-packaged from the manufacturer, good for any exterior lumber,
has some pigments to reduce U.V. rays.
Back to Deck Menu
Tinted sealers / Toners / Natural Toned Stains / Natural Toned Sealers
Are very much the same as a "clear", but have added pigments, either mixed at the factory, or added at the store. Any pre-made
color by the manufacturer is always better than a color the store can make for you.
Natural tone sealers bring out the
wood's natural beauty, they Allow wood grain and texture to show, and are good in U.V. protection.
*Lasts 1 - 3 years. Used for decks, fences, shingled siding or roofs. Pre-mixed by the factory to popular colors, and
you can get them mixed to whatever color you like.
Back to Deck Menu
Semi Transparent sealer / Transparent Stain
 This is Cabot's semi-transparent "Heartwood" on brand
new lumber. Sikken's "Butternut" is similar. This is Cabot's semi-transparent "Heartwood" on brand
new lumber. Sikken's "Butternut" is similar. This is Sikken's semi-transparent "Natural Oak"
on old lumber that we sanded / refinished new. The original finish of this deck was Sikken's Natural Oak. This is Sikken's semi-transparent "Natural Oak"
on old lumber that we sanded / refinished new. The original finish of this deck was Sikken's Natural Oak. This is Cabot's "Cedar Natural Toner". The original
color of the deck was a cedar color. This is Cabot's "Cedar Natural Toner". The original
color of the deck was a cedar color.
These lightly hide the wood grain due to the amount of pigments involved, but are still transparant, and you will still see
wood grain.
They are a better quality than a tinted sealer because it's mixing base already has additional pigments added
from the manufacturer - which are better than what is at the store, so U.V. protection is much better (unless clear). *Lasts
2 - 5 years Pre-packaged from the manufacturer in a variety of colors, Or can be tinted to any color you want. Used for decks,
fences, shingled siding or roofs.
Deck sealer colors that are applied on old lumber seem to look darker than what the package shows, while deck sealer colors
applied on brand new lumber almost look like what's advertised. - but nothing ever really looks like what's in the brochures. It's
always a good idea to do a test sample in an inconspicuous area to be sure you like it. Don't be too judgmental at first,
allow the sealer to dry completely before making your decision.
Back to Deck Menu
Methods of applying sealers
**If someone is going to seal your deck;
Do make sure you have their application method or procedure in writing, and make sure the quality of sealer they will
be using is also in writing.**
There are three common methods for appying deck sealers:
Brush, Roll, and spray.
Brushing is highly proper. Brushing insures that the sealer gets into the pores of the lumber, and makes it easy to
spread the sealer evenly. A few manufacturers specifically say to only brush their product.
Rolling is fine. A roller can apply sealer much faster than just a brush, however, you will still need a brush to even
it out, get up next to the house, and for areas a roller can't get to.
Spraying is just too awesome, but this one should be left for the pro's. Most sealers approve using a garden type
pump sprayer - check the label. A sprayer can get into areas that a brush or roller could never, but you're still going to
need a brush for the same reason you need a brush for the roller.
No matter how the sealer is initially applied, make sure you have your brush handy to deliver the final strokes to work it
into the wood pores, and even everything out.
Back to Deck Menu
How to seal a deck
The ultimate goal in putting any sealer or stain on lumber is to actually seal it up to keep water out and add U.V. protection,
however too much sealer and the sealer may crack, chip, peel, and flake when dry - and also keep the lumber from breathing,
causing certain areas to rot. Too much sealer and your decking floor will be sticky for a long time. Too much sealer and you′ll
have runs coming down your fence.
How do you seal a deck the right way? This bit of information should be helpful, and the same information goes for sealing
a fence. Follow directions provided, and read the product's label, and you too will know how to seal a deck.
This applies to all types of sealers and stains, including Sikkens products and IPE oil. - Keep in mind that all lumber
is different - the more tightly packed the pores are, the less sealer you will need.
- Transparent colors may look
different on new lumber VS old lumber - sample testing in an inconspicuous area is always a good idea.
- Although you
might be tempted to apply a second coat, make sure you follow the manufacturers directions - it's a fine line; If you don't
apply enough sealer, all you're really doing is coloring the lumber, if you apply too much, it may create a surface layer
that will chip, flake, and peel away.
- Make sure there is no rain in the forecast (snow, etc..) for the day you decide to seal.
- Make sure the temperature is above 50 degrees Fahrenheit.
- Make sure your deck (or fence) is clean and completely dry.
- Do not apply sealer in direct hot sunshine if at all possible.
- Everything should be off the deck. Remove birdfeeders,
hanging pots, and things from top rails (hand rails).
If you cant remove something large and heavy, try to push it to
one side of the deck after you've done half the floor, move it back.
- The very last things you put sealer on will be the top handrails, and the decking floor.
- Do all other lumber
first, then do the top rail, followed by the flooring.
It doesn't really matter which side of the deck you start on, you can start on the exterior side, or the interior side. If
you do the most complicated and hardest areas first, the rest of the day is cake.
If you decide to start on the interior side of the deck, begin applying sealer to anything up high (trellis, gazebo, tall
lattice frames, etc...), trying to work one board section at-a-time.
- Sometimes you can't do the full board, but be aware that where ever your brush stops, could leave a stop line, called
a "lap-mark".
- Working in direct sunshine with certain sealers and stains may also will leave lap marks.
Whether you′re sealing a deck or sealing a fence, pay attention to how the lumber is reacting to the sealer as you apply.
Either its being absorbed, or its not being absorbed.
The right way to apply sealer - this is keyYou want the lumber to "drink" all that it wants, but only right now,
and only at this very moment, and only where you are applying sealer to this particular section you are working on.
(knot
holes, lumber cracks, and nail heads always require a little bit of attention.)
If you see that the sealer gets rapidly absorbed into the lumber, that means the lumber needs more - so give it more (but
only right now, and only at this very moment, and only where you are applying sealer to this particular section).
If you see the sealer not being absorbed, use your brush and push what's on the surface →
into the next area / section you will be working on. Your final brush stroke should be long and even, and goes ← back into the area you just came from this keeps a wet edge, and prevents lap
marks.
If the phone rings, or your neighbor comes over (hand him/her a brush), don't stop what you're doing to talk, unless you're
at a breaking point (a breaking point is a full finished section of lumber).
If you drip sealer on the decking floor (you should have used a drop cloth), it's not the end of the world. Simply feather
out your "oops", going with the grain of the wood, when your brush is not loaded with sealer. ("feather" means to lightly
brush out / blend in, using a relatively dry brush.)
After you've done the high stuff, then do the railings.
Railings usually consist of a top hand rail, spindles (that are either enclosed in two by fours or exposed), posts, and
maybe some sort of post cap. Do all this, but don't do the top hand rail yet. Next, Do the skirts that enclose the decking
floor, do the larger support posts under the deck, and both sides of the support beams. Do the exterior sides of the stair
risers.
Now do all the hand rail tops, and then do the decking floor, backing your way down the stairs.
If you don't have stairs,
then back your way into the house (hopefully you didn't step in your work), or over the side to your ladder. Leave it alone
until its dry.
Sealing a fence is just like described above. Apply sealer allowing the lumber to drink what it wants, move on. Spraying or
using a garden sprayer or even a roller might help to apply the sealer for you, but use a brush to finish it off for best
results.
Back to Deck Menu
Deck Sealing
There are several techniques when applying sealers.
We prefer to use a sprayer in "open areas", and "hard to get at areas",
followed by "back brushing", so that the sealer gets into the wood pores.Of course, this is our ideal way of doing it, but
there are different ways, depending on what type of sealer or stain we are applying, and if a manufacturer specifies a certain
application method, in order to keep the warranty valid, we follow their directions. Click this if you haven't read How to seal a deck.
Back to Deck Menu
Deck Staining
Depending on which brand and type of stain applied, the method of application is very much similar as deck sealer, although
sometimes, a second coat is required.
Remember, "Deck stains" are considered sealers.
A deck stain is a sealer that has the most pigments in it, and since it's a "stain", it offers better U.V. protection, although
you lose seeing the natural wood grain.
Deck stain colors come in an endless variety, you can just about get any color possible.
Back to Deck Menu
What gets sealed?
For cedar siding and shingles, just the exposed surfaces.
For fences: It includes the top rail and all lumber that is within access.
For decks: It includes the decking, spindles, posts, skirts, risers, steps, stairs, and handrails. Undersides of decks
are not power washed or sealed unless agreed upon in advance, and in writing.
Sealing your pine deck with a Toner or Natural Tone Color?
Don't expect a pine deck to look like a uniformly stained hardwood floor in your living room, when using a toner or Natural
Toned sealer.
Why?
Because you're comparing an interior hardwood floor stain to a tinted exterior deck sealer (apples vs. oranges).
Pine decking is a soft wood that will absorb liquid more in some areas, less in other areas depending on the density of pores
per square inch of board, the condition of the board, how the board was cut, and how many knot holes there are.
When applying a sealer, each pine board absorbs sealer at a different rate, and amount of sealer.
Interior hardwood flooring
is finished in a different manner, and includes a completely different type of stain. If you want a uniform stained look,
you need to stain the deck with a solid stain - unless your lumber is brand spanking new, there are transparent or semi transparent
sealers that come very close to being uniform.
Back to Deck Menu
When to apply sealer
Apply your sealer in the Spring, Summer or Fall, applying sealer in the winter is not a good idea.
The outside temperature should be no lower than 50 degrees fahrenheit, and rain should not be in the forecast (depending on
what material you apply, rain window could be anywhere from two hours to eight hours).
Applying sealer or stains in direct sunshine is not recommended, neither is applying over a dirty, wet or damp surface.
During Spring, the temperature is perfect, and what better time of the year could you think to get your deck ready for the
upcoming summer fun, but rain is an issue to worry about when applying. Some deck sealers and stains take longer to dry than
others. Check the manufacturer's instructions regarding dry time.
Summer has the excessive heat to deal with, and if you do your deck sealing or staining in direct sunshine, the sealer may
set up too fast.
Fall almost seems to be the perfect time of the year (if not for all the leaves blowing around everywhere), and if you wait
too late in the Fall, you have to deal with chilly winds.
Back to Deck Menu
The water test
The water test is a way of telling if your exterior lumber needs to be sealed or not (decks, fences, landscaping timbers).
METHOD: While your deck is completely dry, sprinkle, splash, or spill some water over the lumber in a few different areas
and see what happens. If the water "beads" or sits on the surface, you're O.K. If the water is being absorbed into the
lumber at all, anywhere, you need to seal. Just because the water isn't "beading", doesn't necessarily mean you need to
seal. Freshly sealed lumber will most always bead for a while. You need to seal when you start seeing that water is being
absorbed into the lumber.
Back to Deck Menu
What about Fences?
Yes, we power wash and seal fences.
On this page, the word "deck" could easily be replaced with the word "fence".
Other than a true cedar fence (which is a different cleaning method in which we hand wash using a mild detergent and soft
bristle scrub brush - with a good rinse of water from a garden hose only), fences are power washed and sealed very much like
we do deck sealing. How can I seal my own fence?First step:
Clean your fence. Now that your fence is cleaned,
we can begin:
It is a good idea to work on just one side of the fence at a time (unless you have a helper working the other side for you).
For normal fences (which would be ″Board on board″ - board slats that are pretty close together and the fence
only has boards on one side, or board slats that are spaced about the size of a board - with more board slats on the other
side), spraying your fence (using a spray rig or garden pump type sprayer) is the easiest method to apply the sealer, although
you will still need a brush to finish it with the final stroke, and to get areas that you have no choice but to use a brush.
Make
sure you spray your fence up and down, and not side to side.
Depending on how fast you are going, make sure you don′t
let it sit too long before you use your brush to go back over everything you just sprayed.
In cases where fence boards are far apart (such as a picket fence), you will need to get the right and left side of each board,
and there are three ways to accomplish this; Spray your picket fenceSomeone either holds a canvas drop cloth
for you on the other side of the fence (to prevent over spray from getting on the grass, bushes, etc...), while someone else
uses a pump sprayer or airless sprayer to apply the sealer,
or,
if you′re working alone, you drape the drop
cloth over the fence while you use a sprayer to apply the sealer - mainly focusing on the edges (don't worry, you will get
sealer on the main board area as well).
Using this method, you will be wasting a lot of sealer (which will end up on
your drop cloth), but with practice, you will eventually get the hang of it.
As you spray, you might want to use a brush
to go back over each board, this is what fills the pores and gives you an even coat, so don′t go too far that it starts
to dry before using your brush. A professional can do this rather quickly, and with minimal materail loss.
if you choose
not to use a drop cloth to catch the over spray; your grass, bushes, plants, etc...could die.Roll your picket
fenceAnother option is use a small roller and a brush.
Width of the roller should be about the same size or smaller
than the fence board.
Roller thickness depends on how much sealer you need to apply, and depending on how dried out your
lumber is.
Thicker (roller covers) hold more material, while thin roller covers hold less (you probably don′t want
a thin roller cover).Get yourself a two gallon plastic bucket and fill it almost halfway with your sealer.
A broom
handle or short rolling stick will twist into the roller handle so you don′t have to work on your knees or keep bending
over (There is also a complete set-up called a ″Hot dog″ roller (for painting behind toilet tanks) that includes
a long metal handle and a roller already on it - that could almost be the same size as a hot dog. Submerge your roller into
the sealer completely, then (using your wrist motion - like turning a door knob - but with a quick flick of the wrist - spin
off excess sealer as you lift the roller but keep it inside your bucket, and then roll the fence board - starting just below
mid section of the board, rolling upward - at first (if you start by rolling down, your sealer will just ″plop″
on the ground).
Using the roller, spread the sealer evenly and allowing the lumber to absorb or take what it wants.
When
your roller is not so saturated with sealer, get the edges (right side and left) of the board (all that you can).
The
areas you can not reach, you will need to use your brush.
When you′re satisfied that the board is done, use your
brush to give it a final stroke; from the very bottom going up.
IMPORTANT;
When you roll the edges of your board, be
aware that you might be creating a build up of sealer on the other side of the board, try not to do this, but if you do, use
your roller (when it′s more or less dry - not loaded with sealer) to remove the build up. Brush your picket fence
Using just a brush only.
The process of hand brushing a fence (rather than spraying or rolling), is very time consuming,
but it's the most thorough.
Back to Deck Menu
Composite Decks
We clean composite decks, including old trex. The old trex composite is known to grow black mold spots, however, we know
a way to delay the mold spots from coming back once cleaned properly.
Back to Deck Menu
Deck / Fence Carpentry
Yes, we provide basic carpentry skills. We can replace lumber slats, deck boards, top rails, and a few other things. Ask us!
Our deck cleaning, deck staining and deck sealing services are availalbe thoughout most of
Northern Virginia including;
Aldie, Alexandria, Annandale,
Ashburn, Bristow,
Burke, Centreville, Chantilly, Clifton, Dumfries, Fairfax, Fairfax
County, Fairfax Station, Gainesville, Great Falls, Haymarket, Herndon, Lorton, Loudoun
County, Manassas, McLean, Mount Vernon,
Nokesville Oakton, Prince William County,
Reston, South Riding, Springfield, Vienna, and Woodbridge ...to
name a few.
|